There’s a really high chance you’ve browsed a couple of “find a job” websites before - most of them are full of clutter, expensive for business owners to publish advertisements on, and hard to use. Unlike other platforms, Whop’s Job Board app is a super easy app to use for both creators (you) and regular members.
The Job Board app is a place where business owners can publish recruitment postings for the members of your whop to apply. The app has a simple and effective application and categorization system that makes the process straightforward for both parties.
In this guide, we’re going to remember what Whop apps are, how you can add the Job Board app to your whop, and how you can use it.
What is a Whop App?
To understand what a Whop app is, let’s first think of a whop as a platform where you control its features. Let’s take Zoom, for example - it has features like video calls, chat rooms, screen sharing, and more. But if you don’t want Zoom to have a chat room, you can’t remove the feature. What if you want it to have a giveaway feature? Again, not possible, as you can't add features to Zoom.
On a whop, however, you can add, remove, or swap features - or “apps,” as we call it. If you want people to be able to chat in your whop, you can do that by adding the Chat app. Or maybe you want to create online courses - the Courses app is here to help you. There are a lot of apps on Whop that allow you to add any feature you want to your platform, and with all the feature clutter today’s apps have, this is refreshing.
Adding apps to a whop is free, and you can add as many instances as you want. This can help you create layers within your whop or different content based on the same app. Now that you know what a Whop app is, let’s take a look at what the Job Board app is.
What is the Job Board App on Whop?
As its name suggests, the Job Board app on whop is a page where you can post job openings for your platform, company, community, etc.
Sharing job postings on the Job Board app is super easy. You can customize the posts with all the necessary details you want to share with your members, and you have an advanced dashboard to keep track of responses, contact rates, and more.
While the app’s main purpose is to list job postings and recruit people, you can use it to find people for project collaborations, volunteers, and more. Think of the Job Board app as a place where you can recruit people - even if the recruitment isn’t for a full-on paid job.
The Job Board app is great, but how do you exactly add it to your whop? Let’s see.
How to Add the Job Board App to Your whop
Before walking you through adding the Job Board app to your whop, we want to make sure you have a whop to begin with. If you do, you can skip this paragraph. If you don’t, check out our How to Create Your Own whop guide to see how you can create one in under 5 minutes.
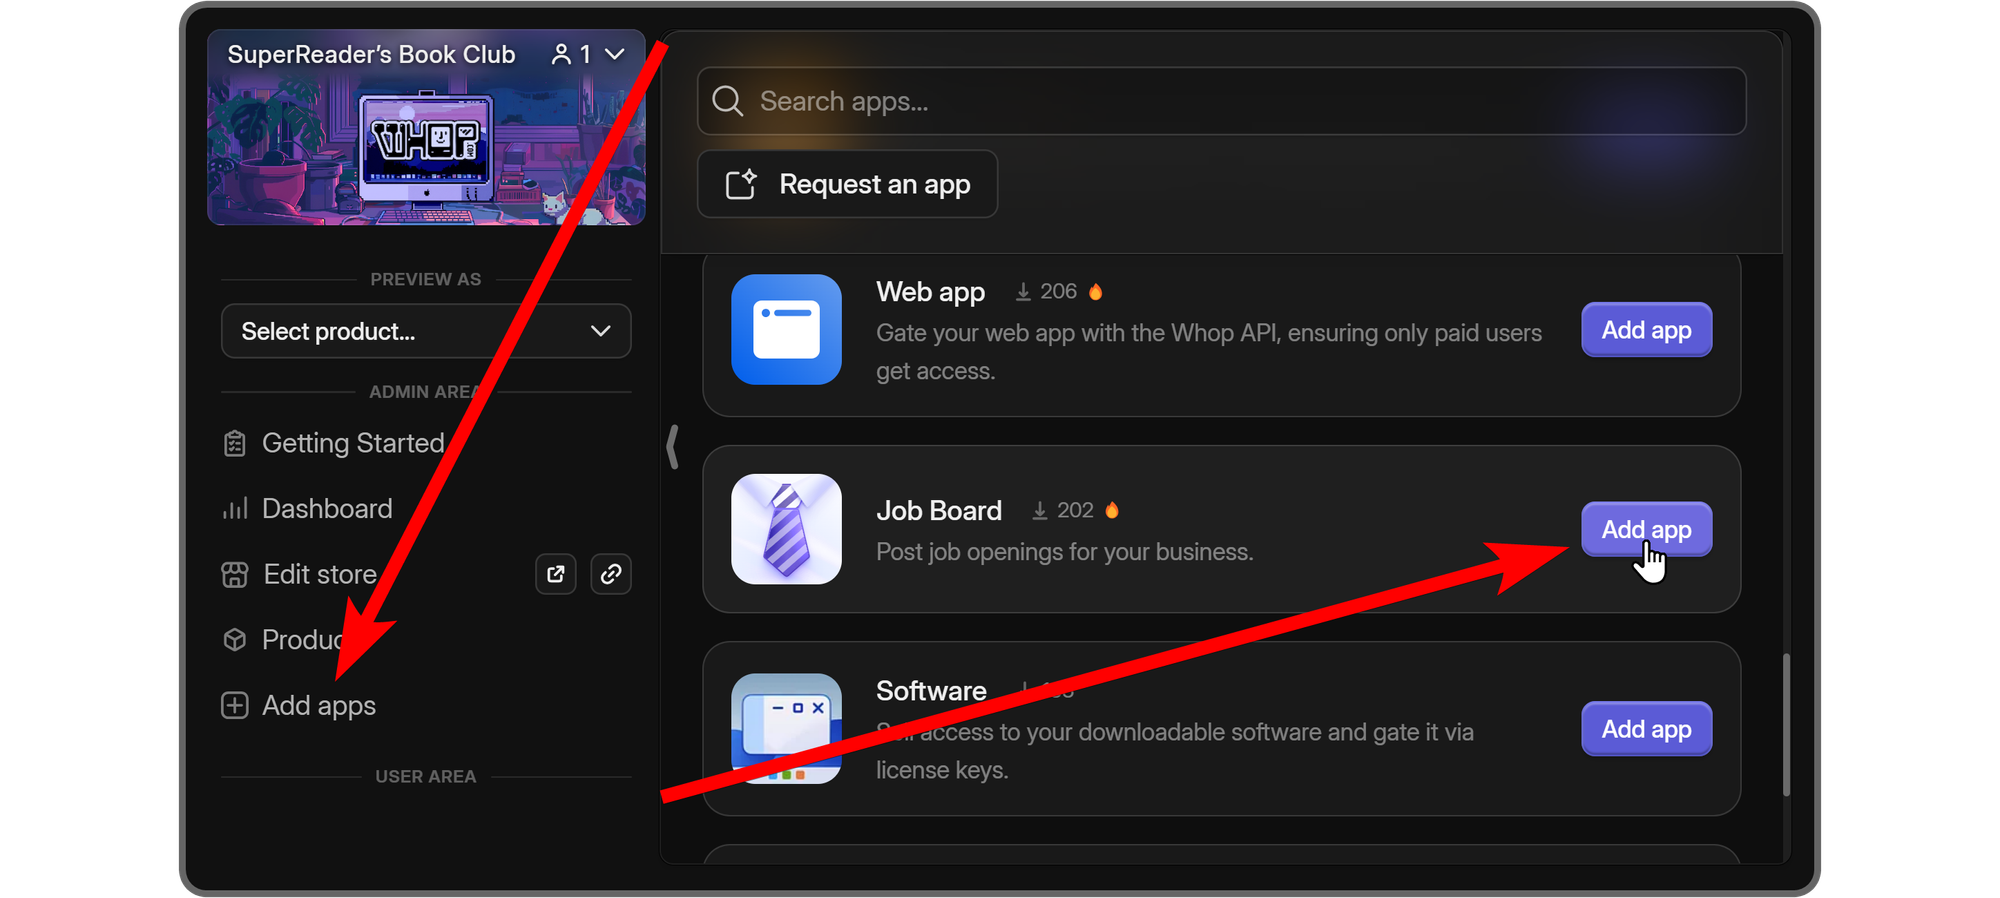
If you do have a whop and you’re ready to go, let’s see how you can add the app to your whop. The first thing you should do is to click the Add apps button under the Admin Area of your whop to view the list of all available apps. Once you’re there, find the Job Board app and click on its Add app button. If you can’t find the app right away, you might want to use the search bar at the top left of the apps list.
Using the Job Board App
When you first add the Job Boards app to your whop, you’ll be directed to its Set up section. If you take a look at the top of your screen, you’re going to see three sections: Set up, Preview as user, and Access. Almost all apps on Whop have them, and they each allow you to access different parts of the app. These sections are only visible to your whop’s staff. Regular users will only see what you’ll see if you click on the Preview as user section.
Let’s start with examining the Set up section of the Job Boards app.

1. Set up
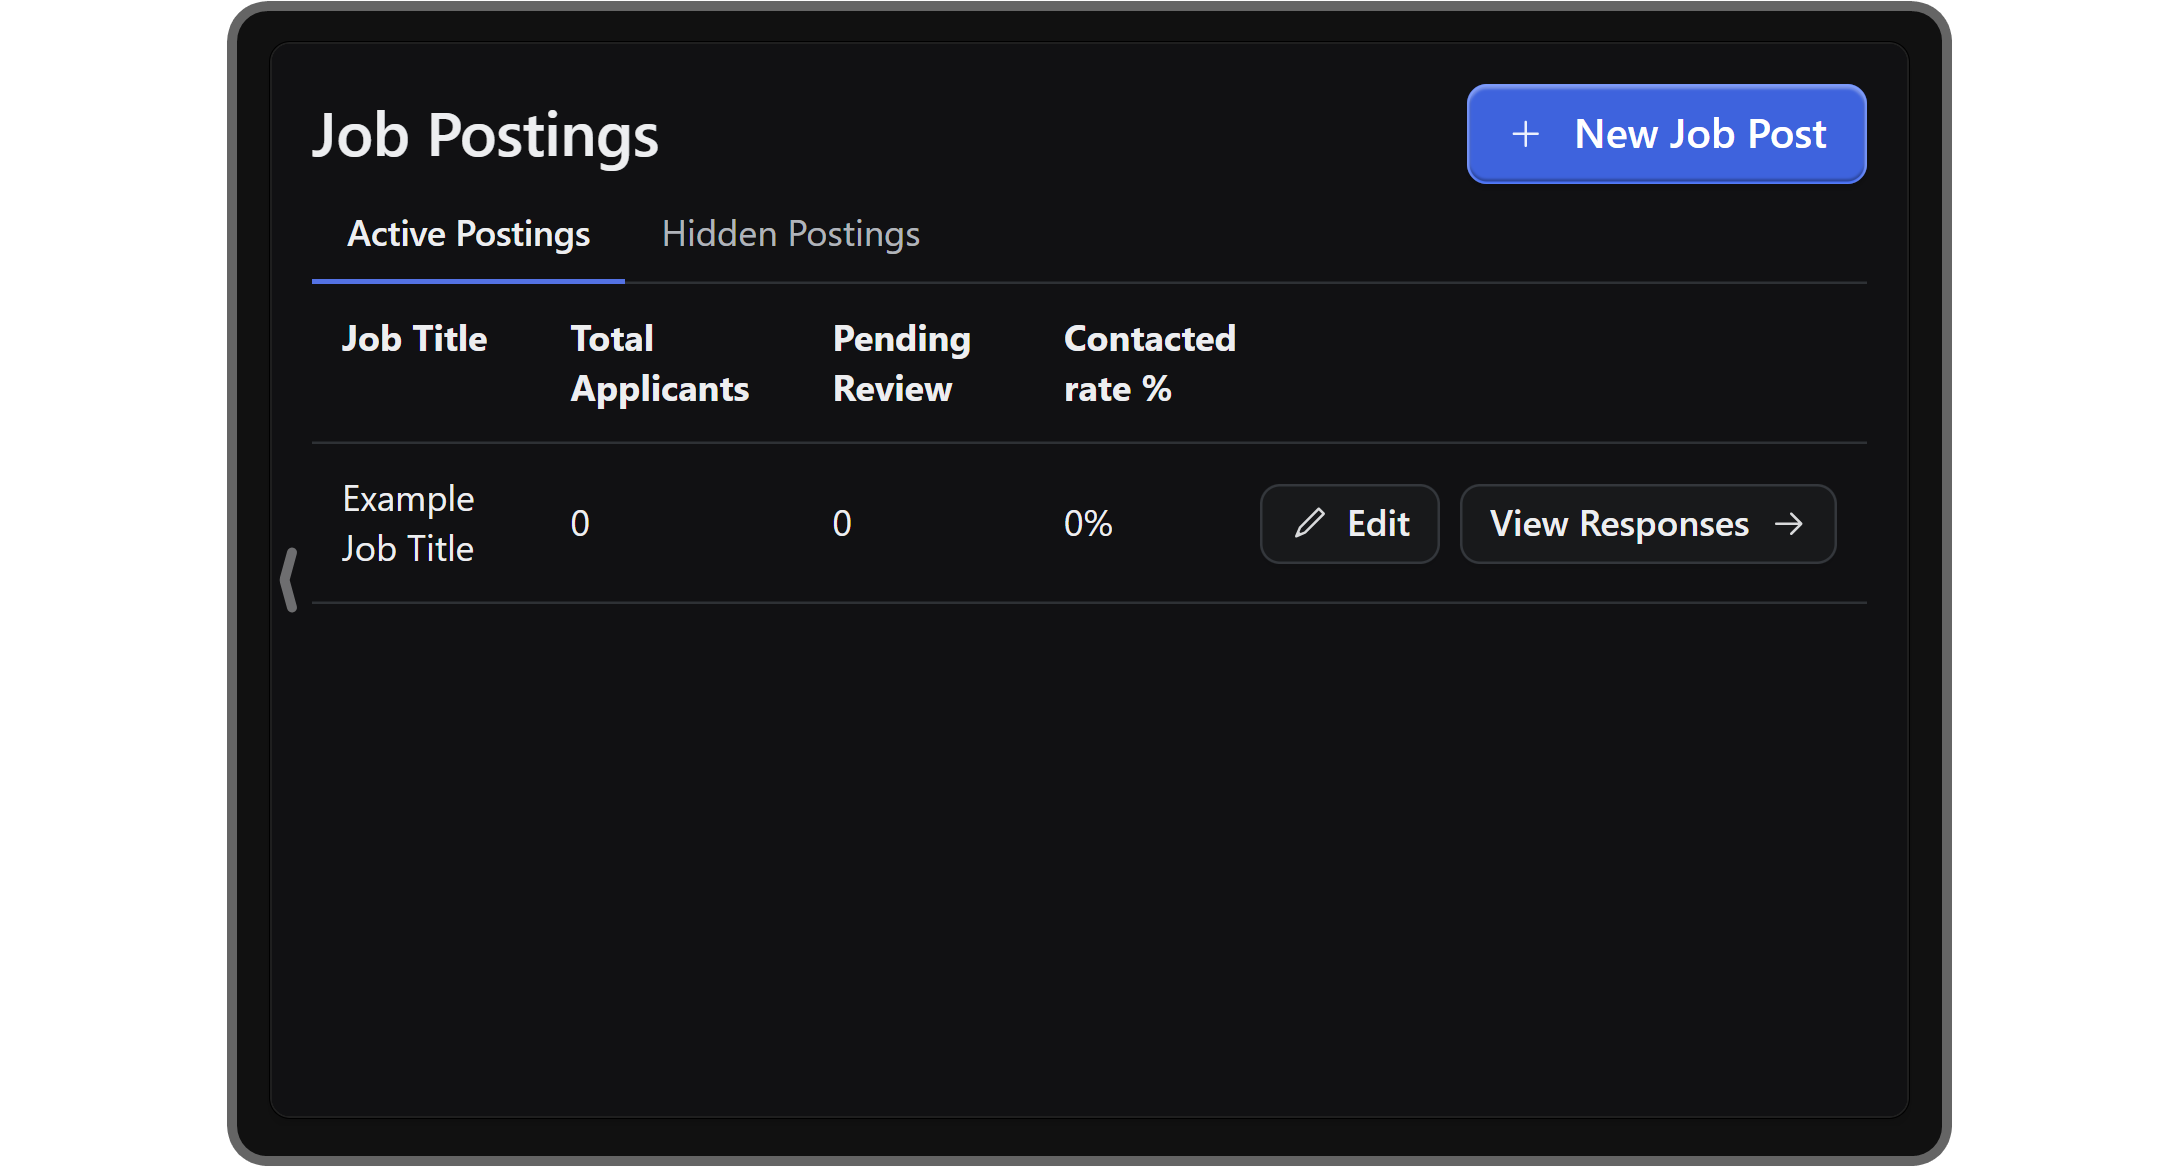
When you first take a look at the Set up section of the Job Board app, you’ll see two tabs: Active and Hidden Postings, a New Job Post button, and an empty list of job postings (in the Active Postings tab.) Let’s click on the New Job Post button to start creating a new post.
Creating a listing
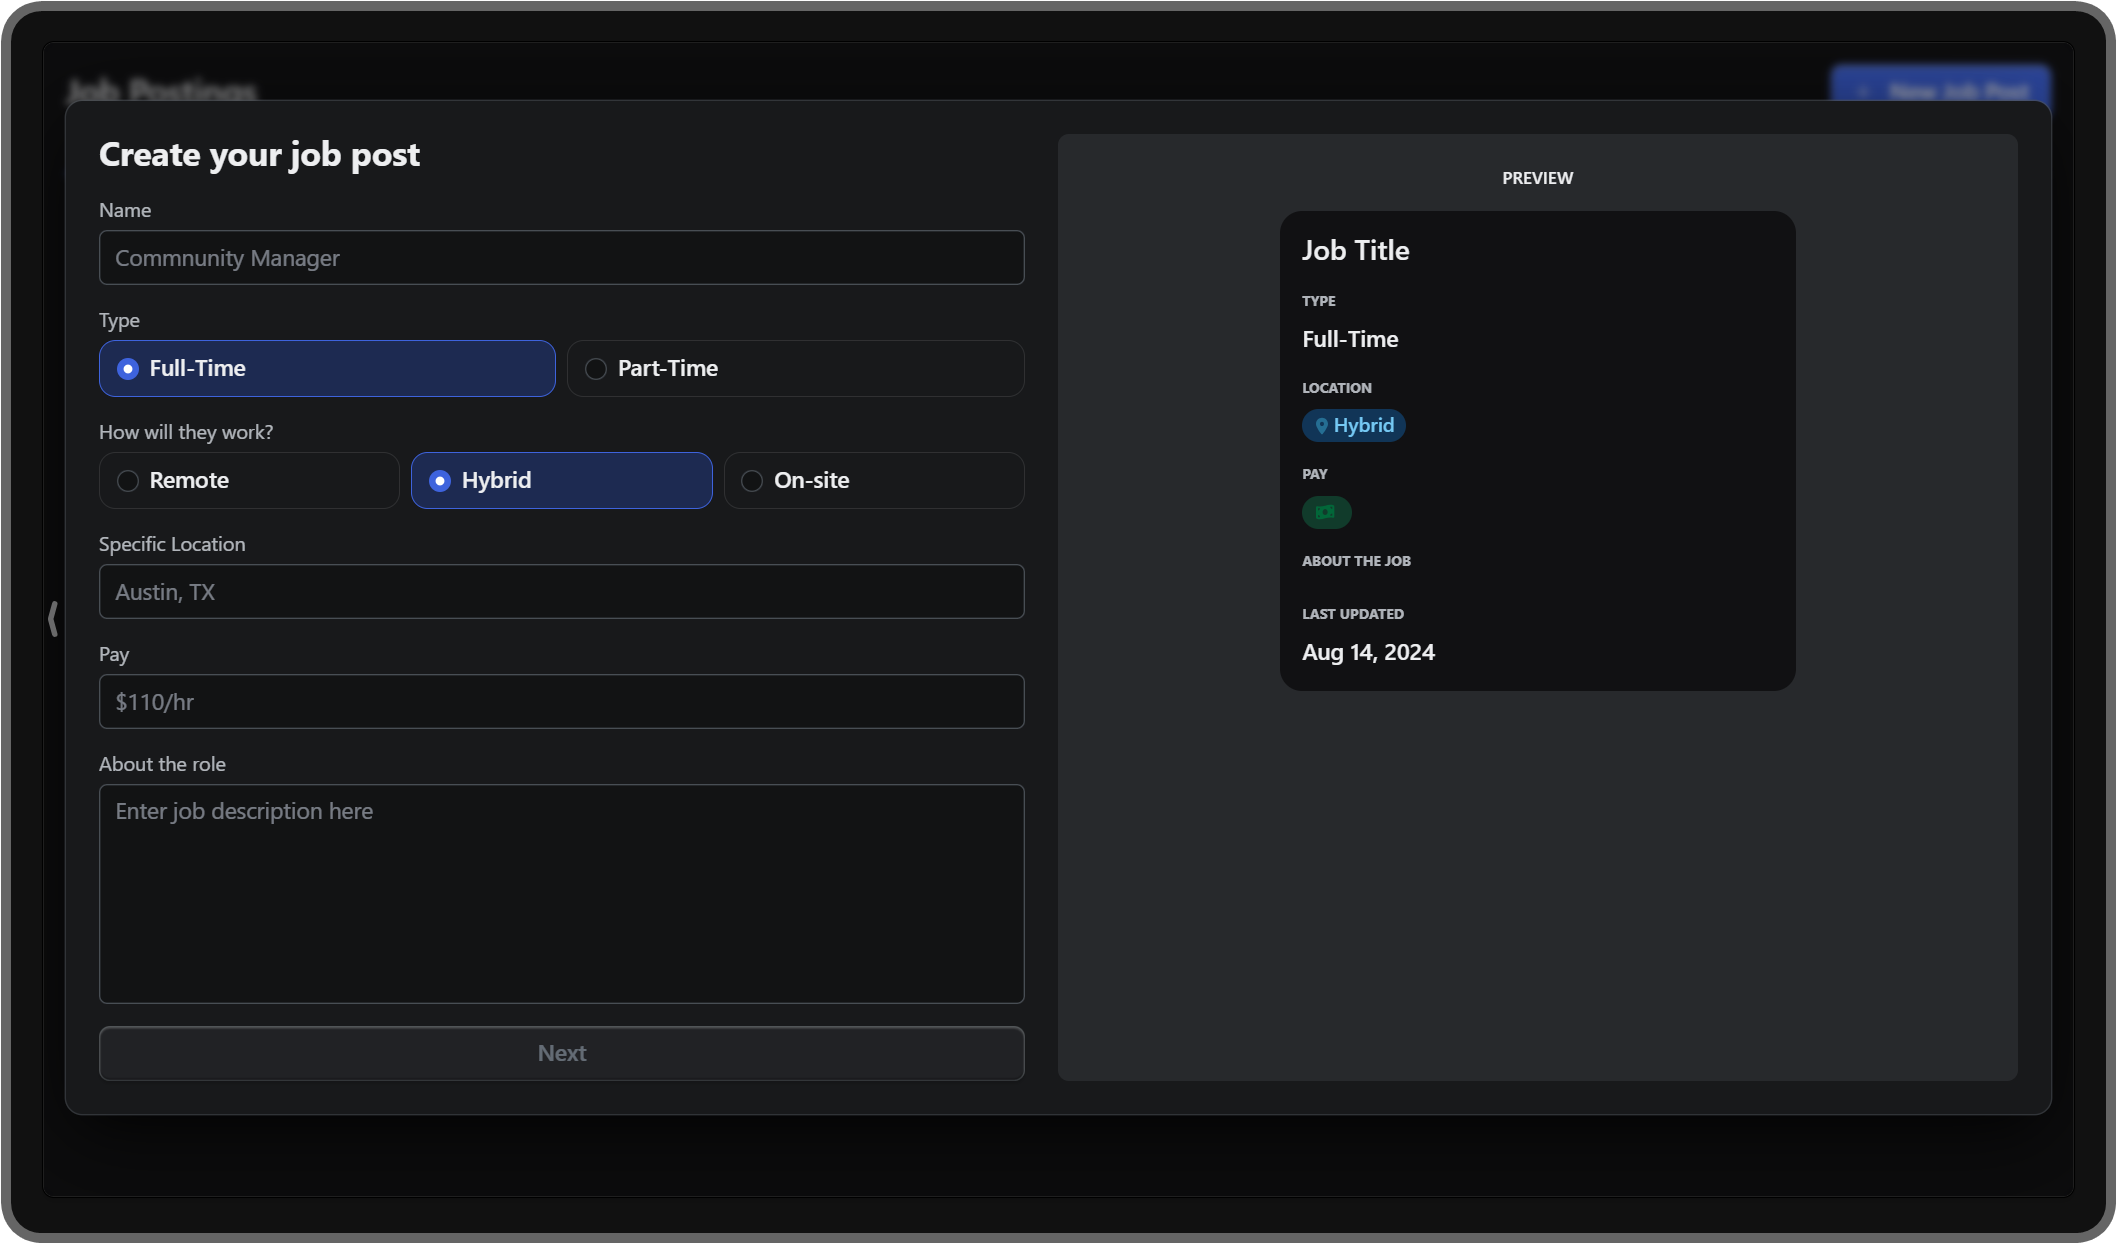
After clicking the New Job Post button, you’ll see a form popup where you can enter the details of the job posting. Let’s examine each section:
- Name: This is where you should enter the name of the position you’re creating the job post about.
- Type: This is where you select whether the position is full-time or part-time.
- How will they work?: This is where you select whether the position is remote, hybrid, or on-site. If you select the hybrid or the on-site options here, you’ll see the “specific location” section appearing below.
- Specific Location: If you’ve selected the hybrid or on-site options on the “How will they work?” section, you’ll have to enter the location of the position here.
- Pay: This is where you should enter the pay of the job. This is a custom text box, so you can enter whatever you like: $50/h, $104,000/y, pineapple pizza (paying people with pineapple pizzas might lower your success rate), etc.
- About the role: This is where you should enter a comprehensive description of the job.
Once you’ve completed all the sections, it’s time to proceed to the next step. Press the Next button at the bottom left of the popup to proceed.
Adding application form questions
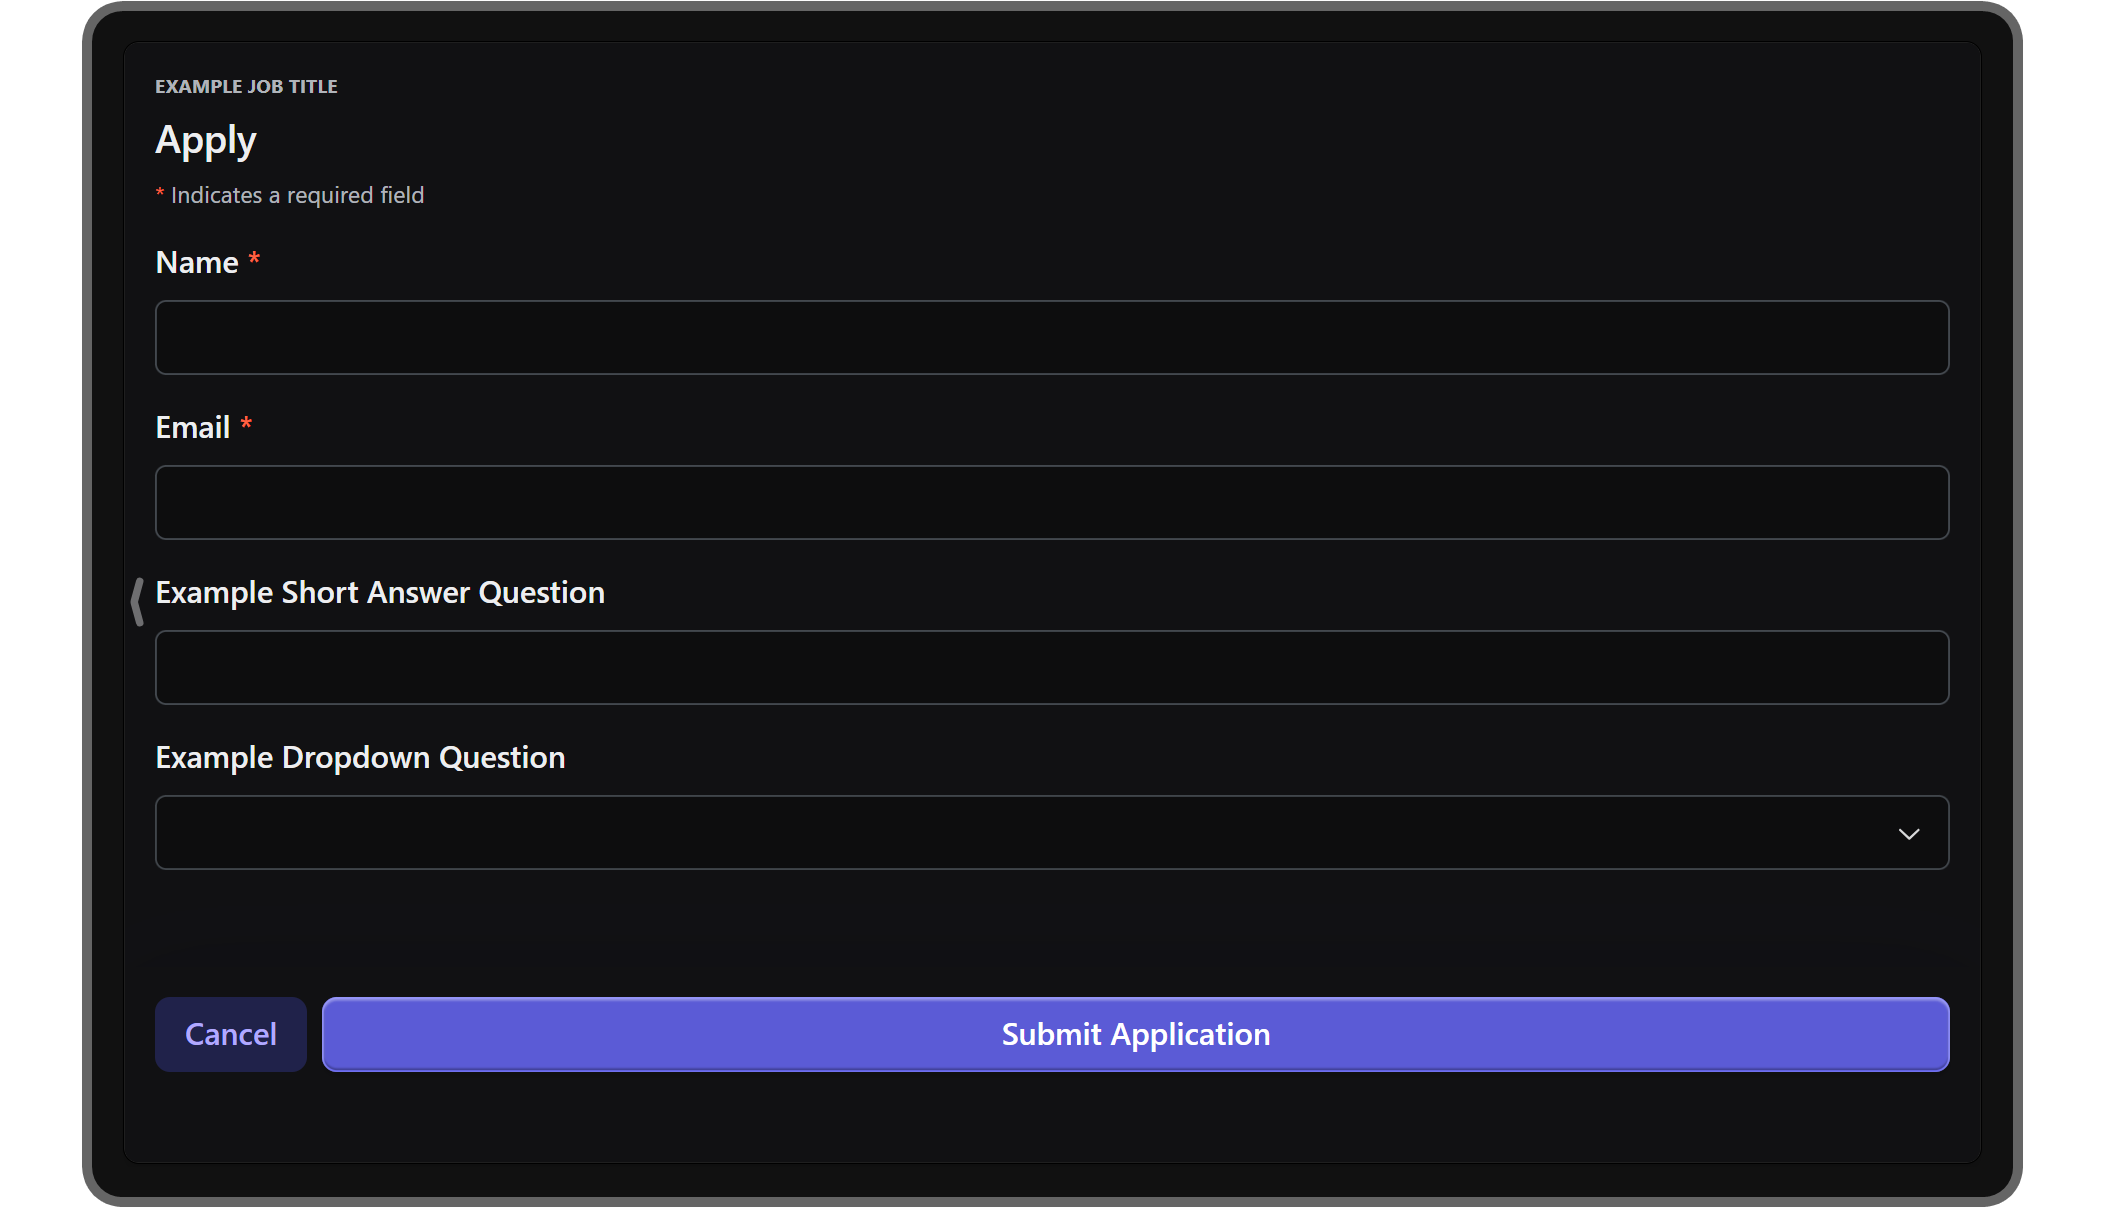
When you click Next on the first step of creating a job post, you’ll move on to the application form questions, which is the last step before publishing the post. Initially, there are two default questions: name and email. One of the most powerful aspects of the Job Board app is that you can add custom questions to the application form (we will get to how the application form works in the next section.) You can add as many custom questions as you want, and they could be short answers, long answers, dropdown selections, and file upload questions. You also have the option to mark them as required.
Publishing the job listing
Once you’re done, you can click the Save and Publish button to publish the job posting or the Save as Draft button to save the posting as a draft.

After you publish a posting, it will be listed under the Active Postings tab with details like the job title, total applicants, pending reviews, and contacted rate percentage. Clicking the Edit button on job posts will allow you to edit the posting.
Viewing applications
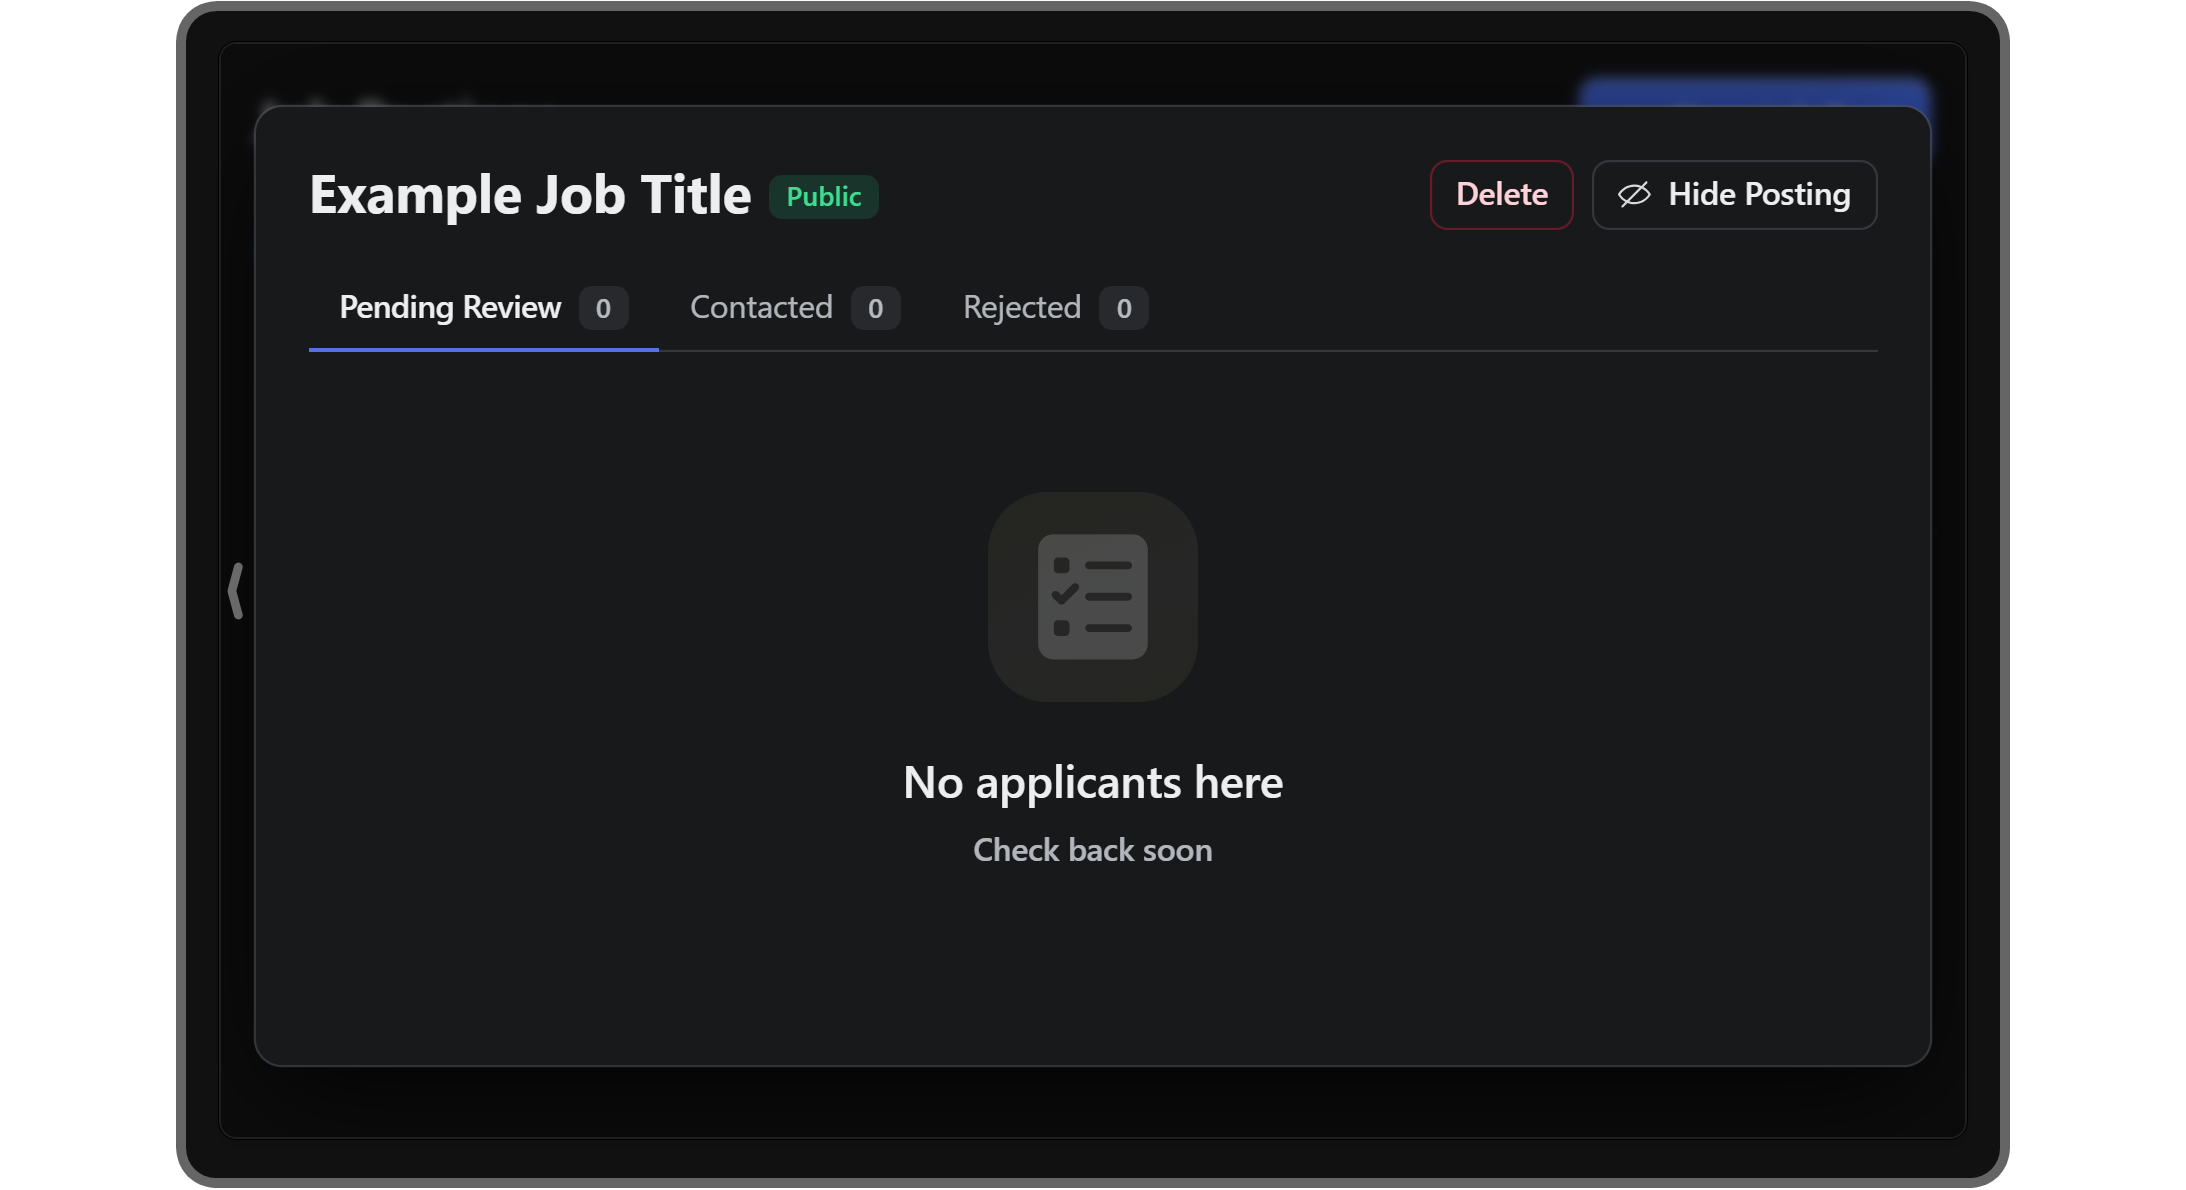
To see the applications of a job posting, you can click the View Responses button next to them. This will display a popup window with all applications listed in it. You’ll also see the Delete and Hide Posting buttons at the top right of this popup which will delete the job posting and archive it, respectively. If you click the Hide Posting button, the job posting will be moved under the Hidden Postings tab in the Set up section.
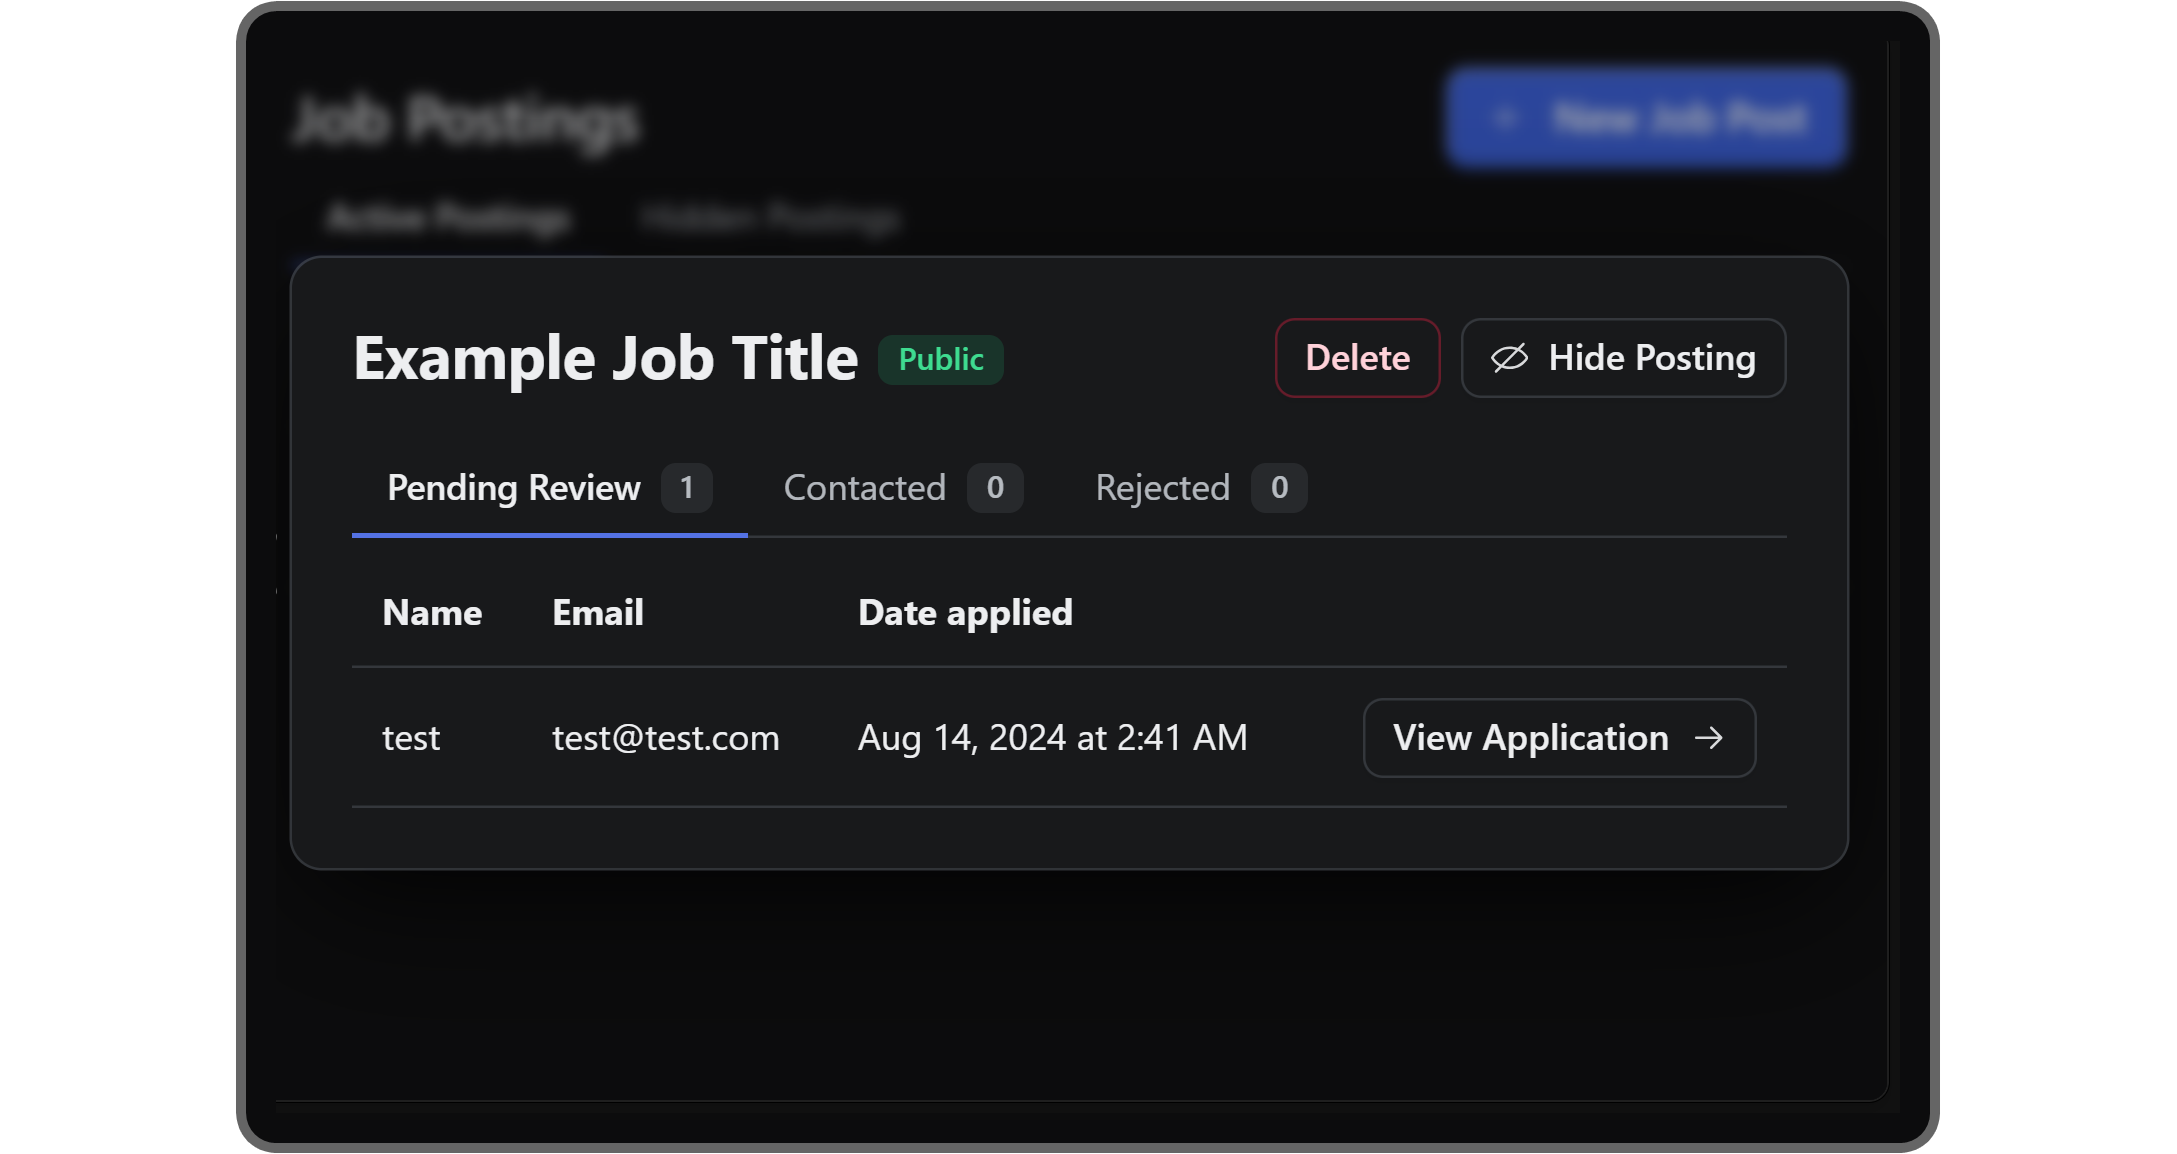
The listed applications are categorized into three tabs: Pending Review, Contacted, and Rejected.
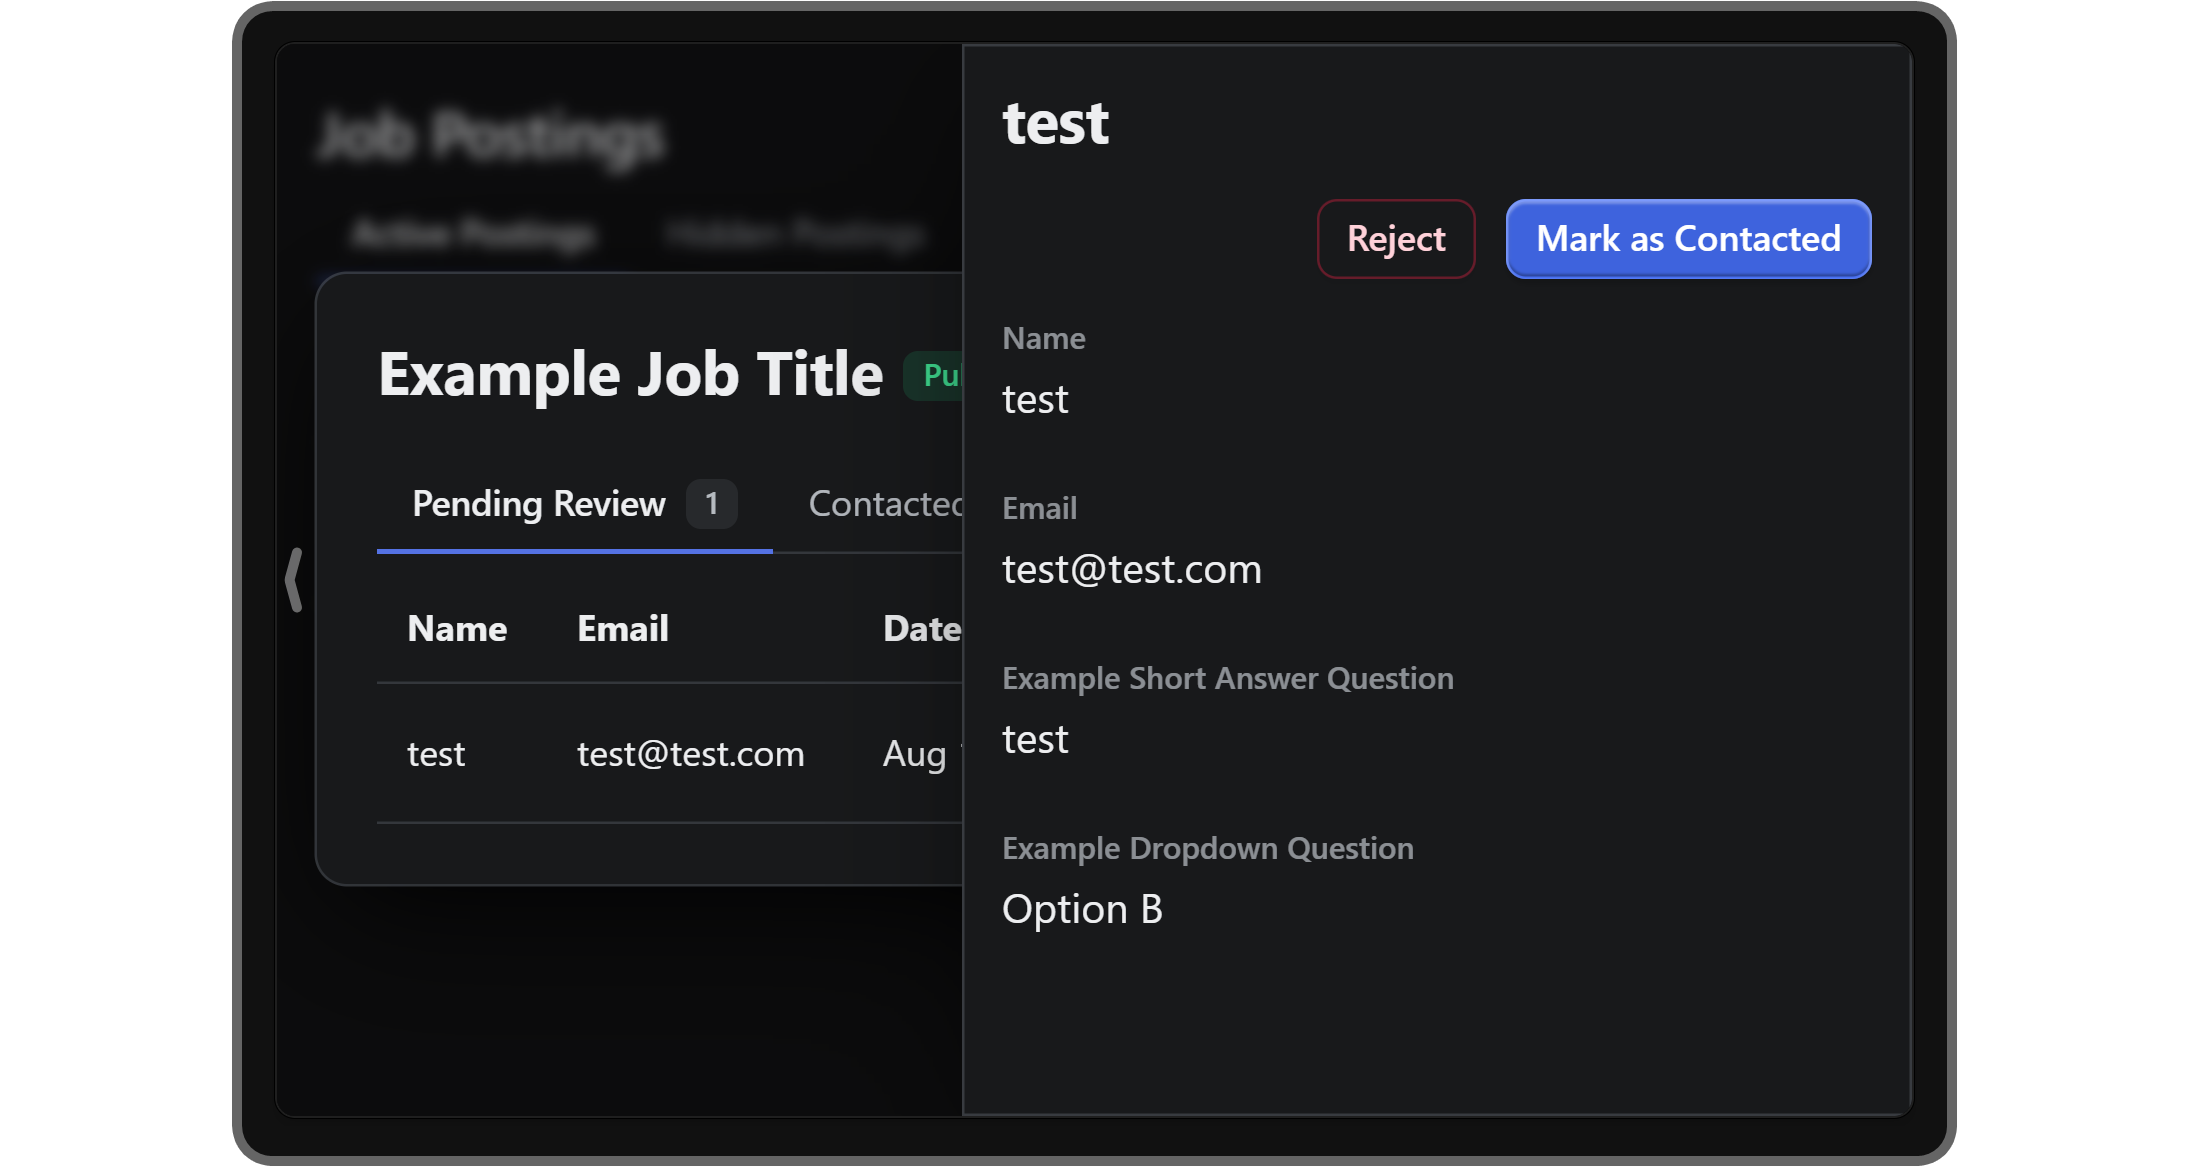
You can change the status of applications by pressing the View Application button next to them. This will display the application’s form answers and two buttons: Reject, which will reject the application and move it under the Rejected category, and Mark as Contacted, which will mark the application as contacted and move it under the Contacted category. This will also change the category of the job posting from the regular user’s perspective. They, too, have a couple of tabs in their version of the app, but the categories are the same: pending, rejected, and contacted.
Let’s examine the Preview as user section.
2. Preview as user
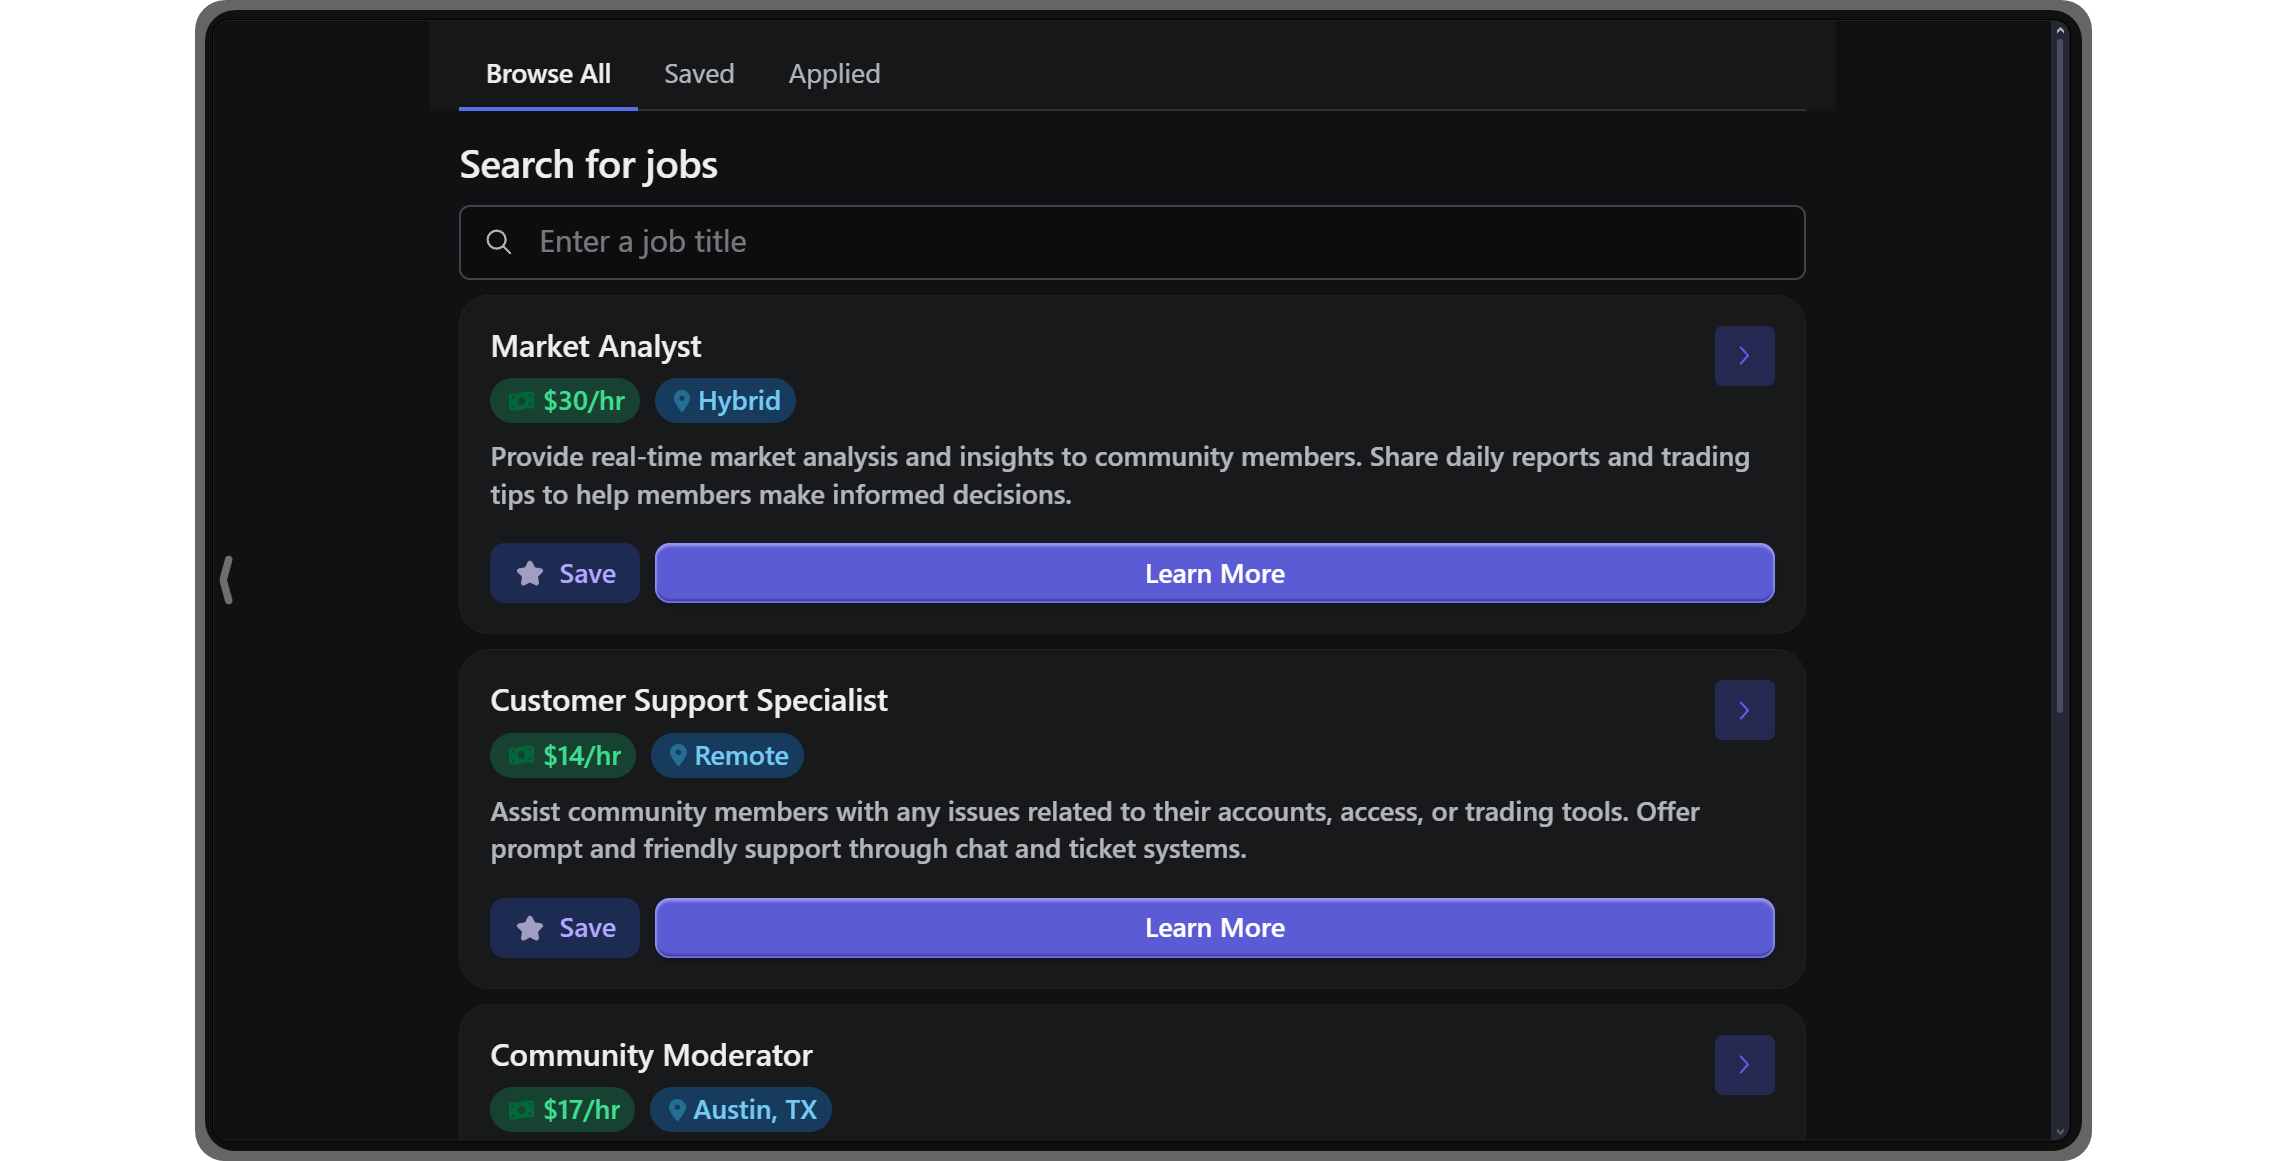
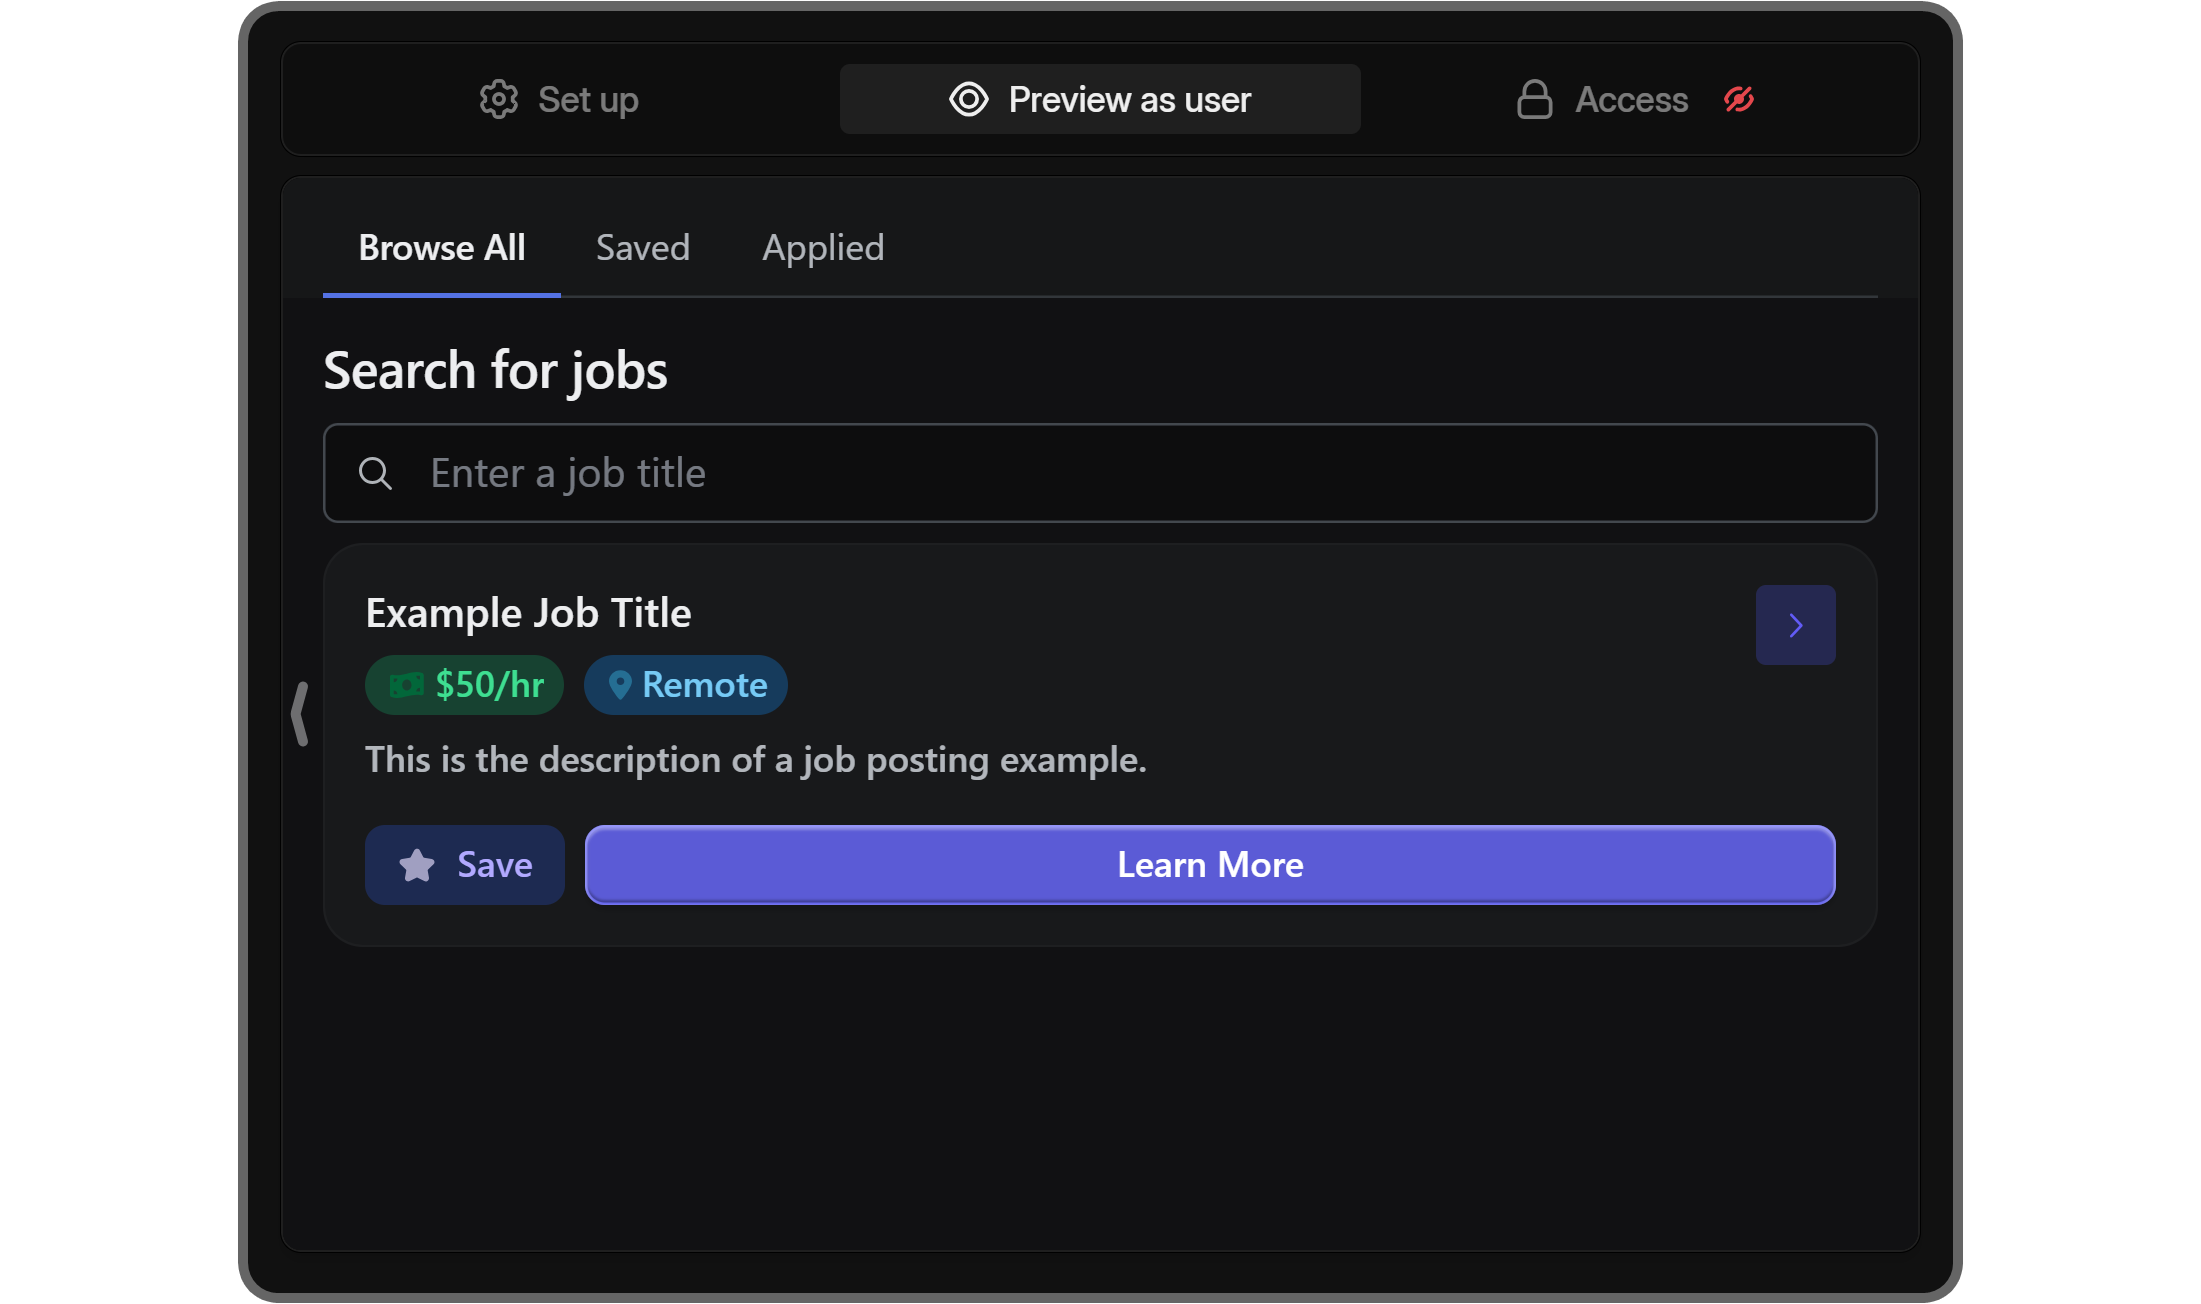
Now that we’ve covered publishing job postings, let’s see how regular users are going to interact with the Job Boards app. When you click on the Preview as user section, you’re going to see a different view of the app than you did on the Set up section. As its name suggests, the Preview as user section will display the app from the perspective of a regular user so you can test how the app works. When you take a look at the Preview as user section, you’ll see three tabs:
- Browse All: This tab will list all available (unarchived) job postings.
- Saved: This tab will list all job postings that the user has saved. Users can save job postings using the Save button on the bottom left of job postings.
- Applied: This tab will list all job postings that the user has applied to.
Below the tabs, you’ll see all the job postings that you’ve published so far. We’ve created an example testing for demonstration purposes.
As you can see, each job posting will have its own card with three buttons: See details button (right arrow) to see the details of the post, Save button to save the posting for later use, and the Learn More button to see the details of the post, just like the enter button.
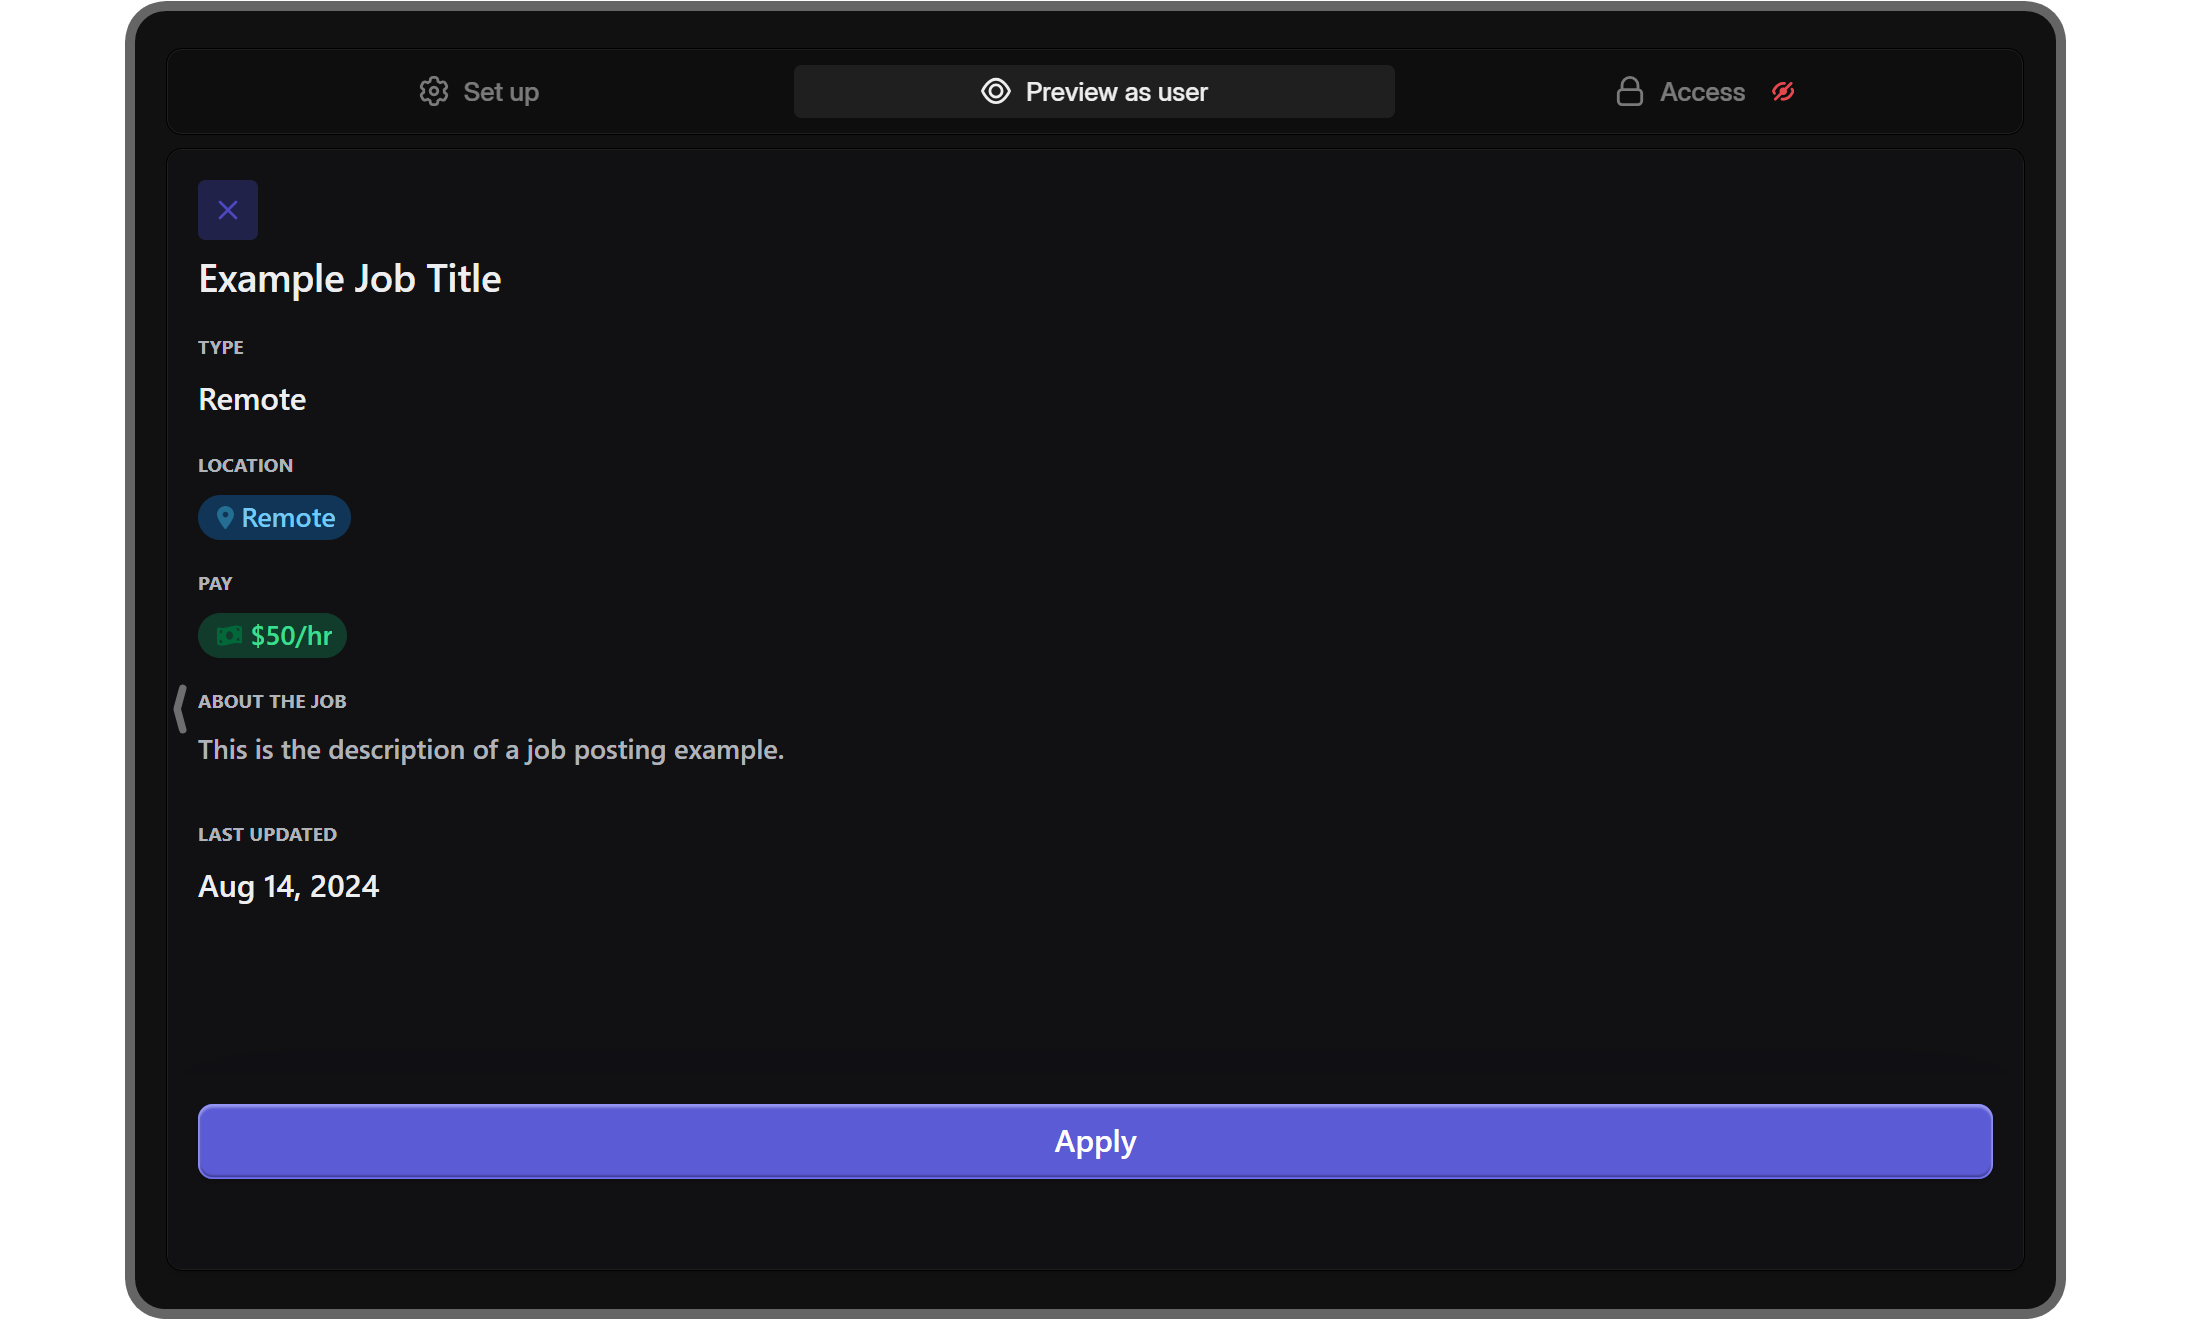
Let’s click on the Learn More button to open up the details of the job posting. That’s where people can actually apply for the position.
After you click the Learn More button, you’ll be directed to the details page of the job posting. There, you’ll be able to see all the details of the posting, which we’ve configured in the Set up section of the app. You can also see the Apply button at the bottom of your screen.
Let’s click on it to test your application form.
Clicking the Apply button will direct you to the job posting’s application form. This is where people are going to see the the default and custom questions of the application form. Since you’re able to create indefinite custom questions with answer types of short, long, dropdown selection, and file upload, we’ve decided to add two example questions to our form: short answer and dropdown selection.
After you fill out the form, you can click the Submit Application button to finish up the process and send your application to well... yourself.
Now, if you go back to the Set up section and click the View Responses button on the job posting, you’ll be able to see your application there.

3. Access
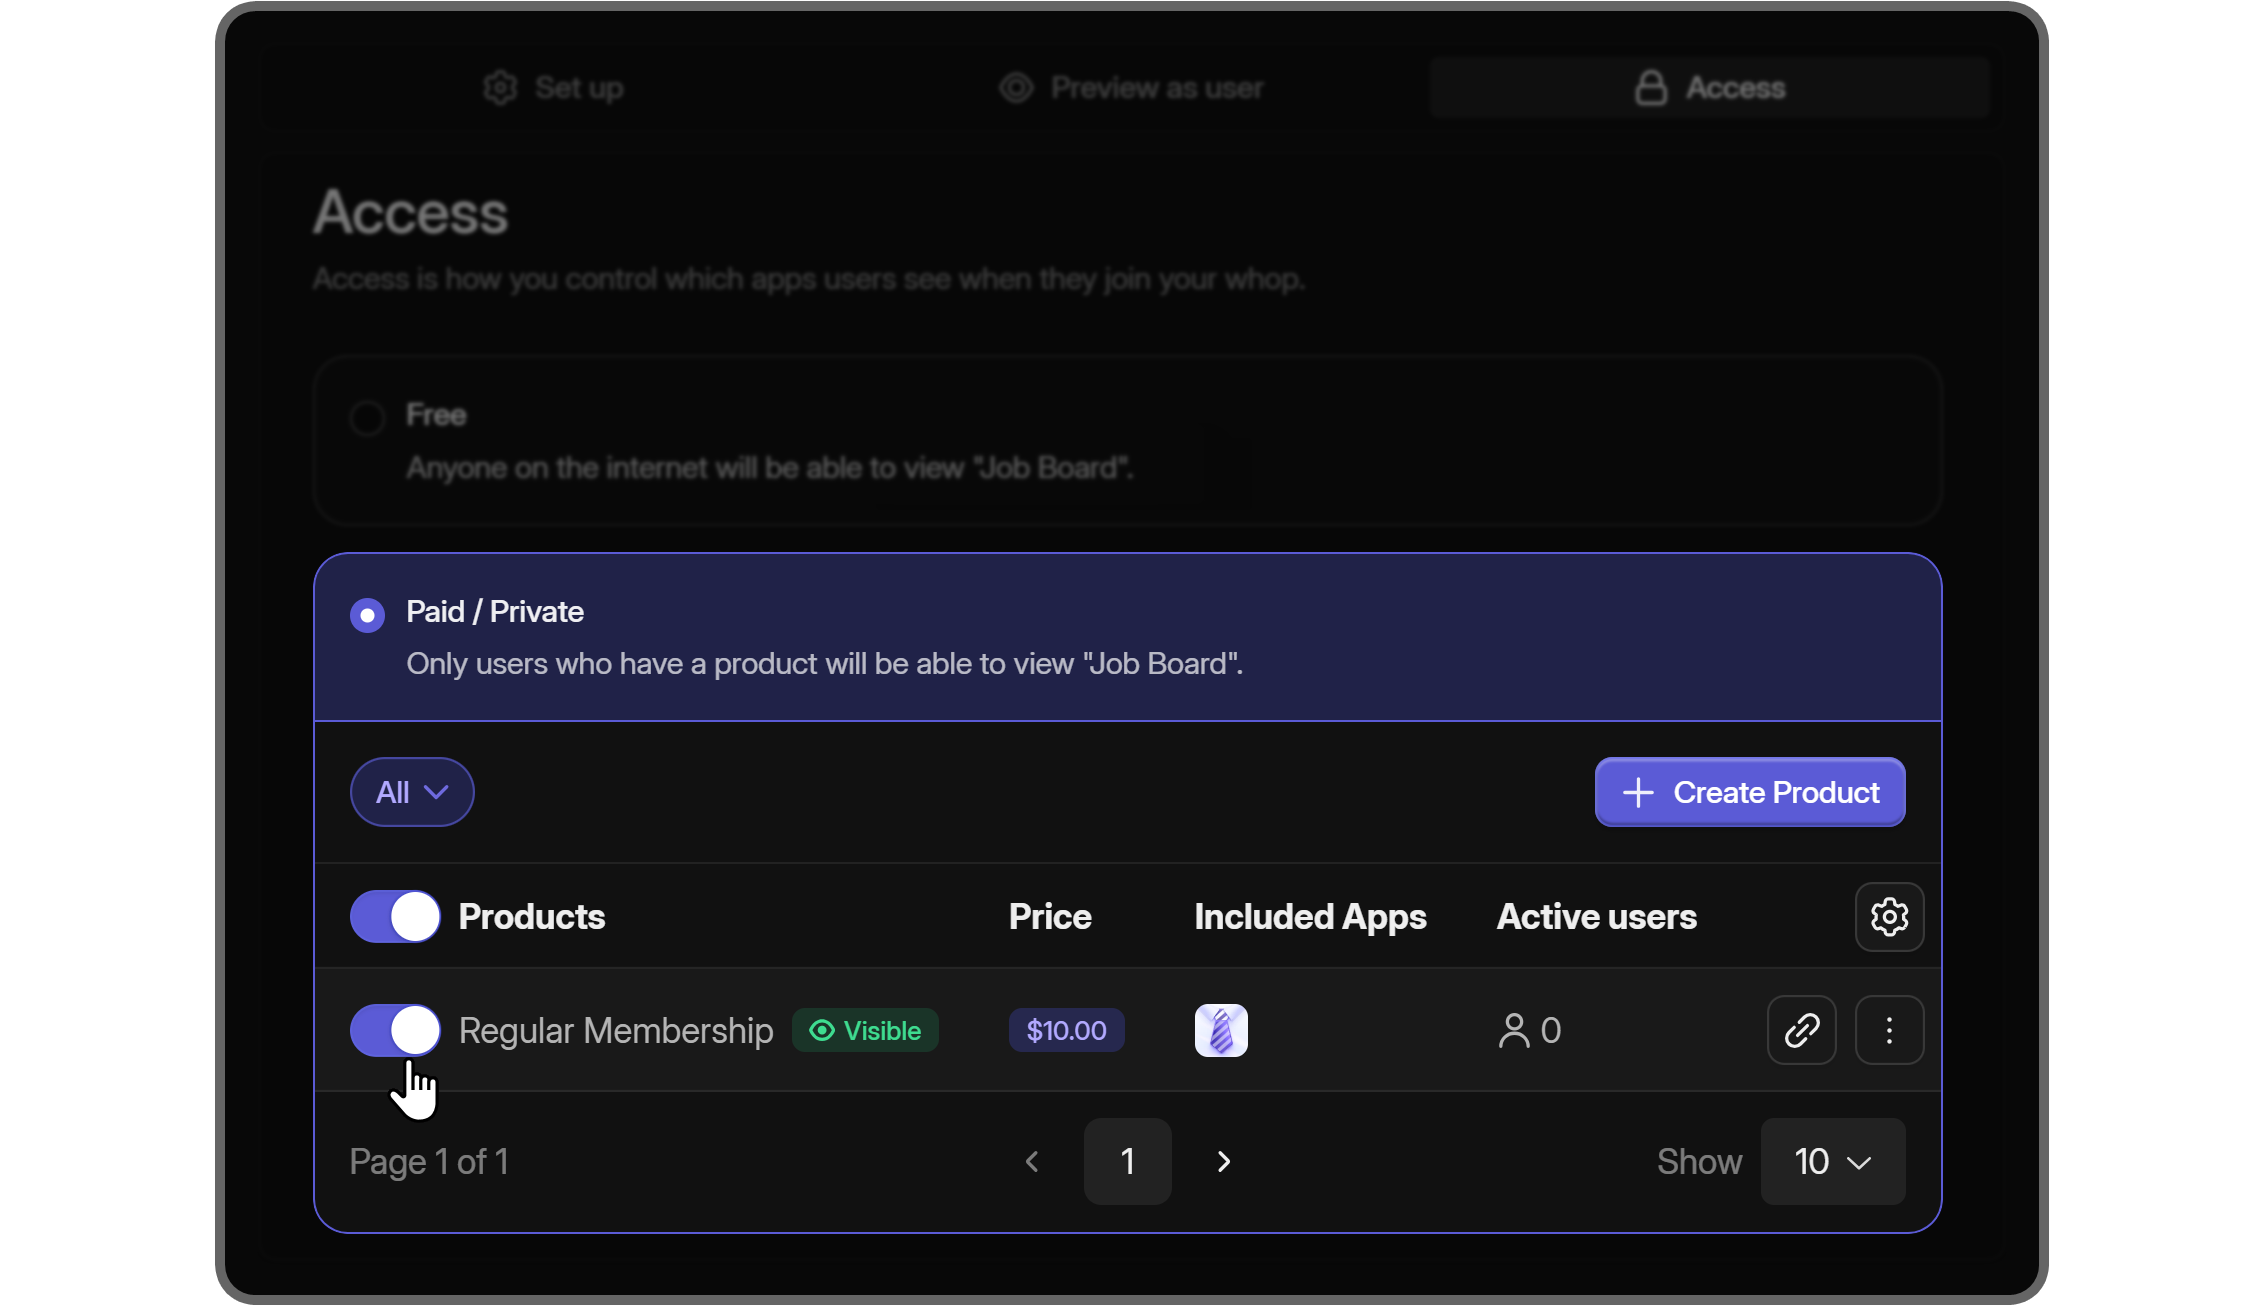
The last section that the Job Board app has is Access. This is the section where you determine how people can access the app. As you can see in the section, there are two options: Free and Paid/Private.
Selecting the Free option will make the app accessible to everyone on the internet. This means anyone who has the link to your whop or the app itself will be able to see your job postings and apply to them. If this doesn’t sound like what you want, you should select the Paid/Private option.
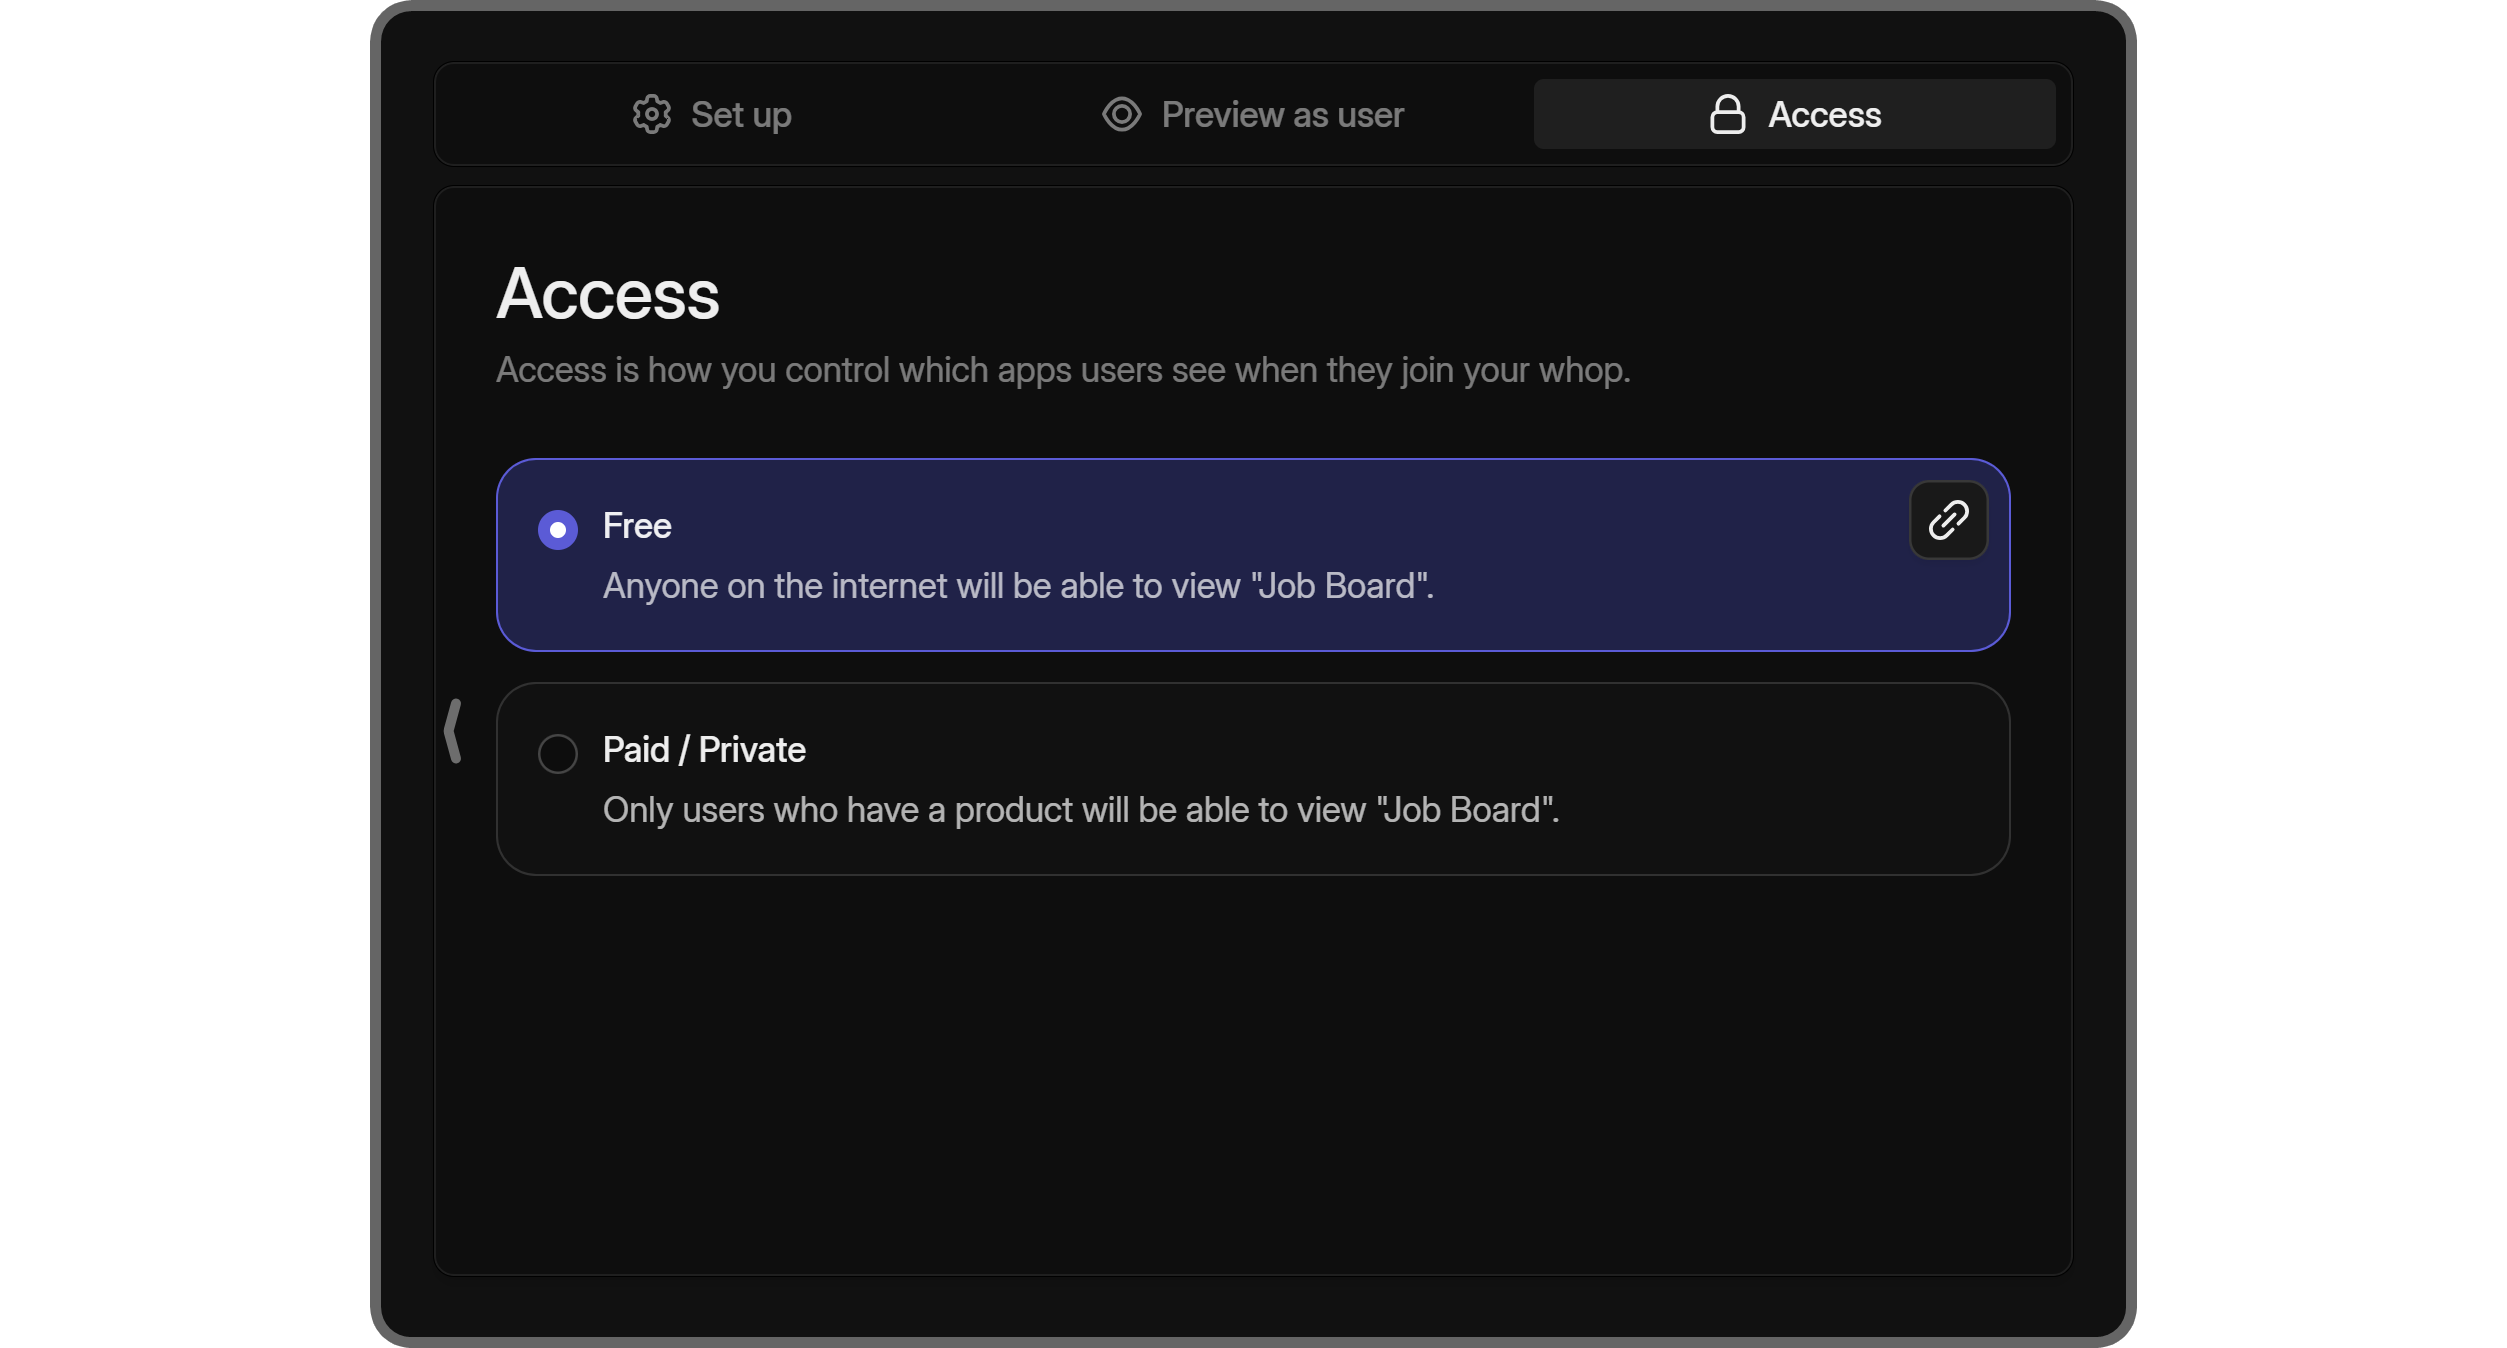
Selecting the Paid/Private option will list all the products on your whop with toggle buttons next to them. If you don’t have any products, you’ll be prompted to create one, and you can do so by clicking on the Create Product button. While the process of creating products is very simple, you should check out our How to Create a Whop Product guide to learn everything about the process.
Once you have a product, you can click on the toggle button next to it to link the app with the product. As you might’ve noticed, as you create a product, it can be free, paid, waitlisted, or private. This means that you’ll have greater control over how people access the app when compared to the Free option.
Start Selling Access to Your whop
Thousands of people have been using Whop to create their dream digital platforms, and many of them monetize them using paid products. Features like 7/24 support, advanced analytics, an easy-to-use dashboard, and unlimited customization options help you create the perfect digital platform in a very short time.
Singing up to Whop, creating your own hub (whop), and starting to sell access to it takes less than 10 minutes. Don’t wait any longer, sign up today.
